Search This Blog

All Posts

Showing posts with label how to. Show all posts

Thursday, September 29, 2016

How We Compost

I got the idea to start composting from Pinterest (surprise surprise) when I looked into starting a garden. Our plan was to have a small garden this summer. Some tomato plants, cucumbers, maybe some leafy greens for salads, and some herbs. But with our third baby being due mid-July we figured it wasn't the best season of life to add a garden to our list of responsibilities.  But I figured I would give composting a try anyway. I felt bad just throwing away useful food that can be used to add nutrients back into soil. I'm happy to say we still compost and its honestly one of the easiest things to do, and if you have a garden (vegetable or flower) or even trees, composting can really be beneficial. 
After a short trial and error period, this is the process we have come up with...

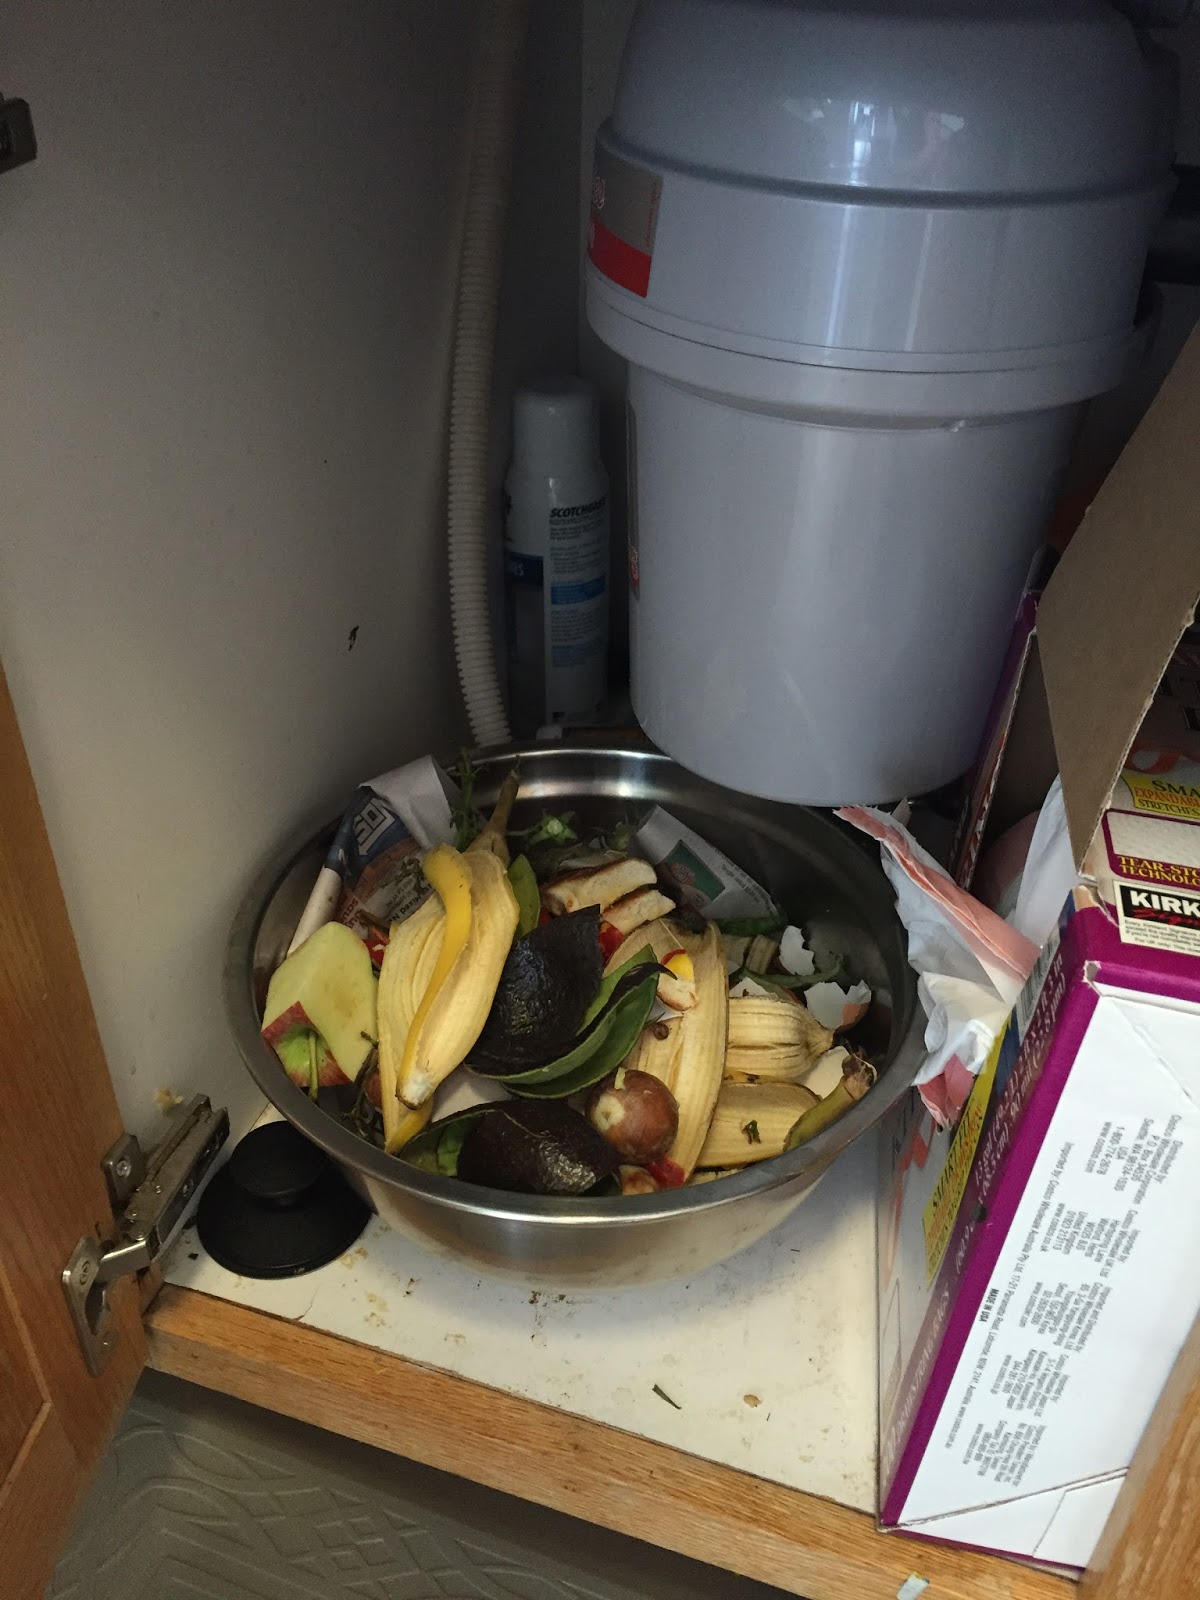
I keep this big metal bowl under my sink. One day I hope to "upgrade" to some sort of bucket, just haven't gotten around to actually doing it. 


When my bowl gets filled we take it out to the very far corner of our yard. I want to say we do this daily, but we don't. We get so caught up with doing other things that we forget. But we do take it out either every other day or every third day. 

This is the area where we dumb the contents of the bowl and bury it with some dirt. Currently we have a pile of dirt/gras next to it that we use to cover the scraps of food. When composting you have to cover the scraps with dirt. Later on that same dirt can be used for the garden. 

Once my bowl is empty I sometimes wash it (if there is any scraps left) and add a newspaper to the bottom. I add the newspaper so that I don't have to really scrub the bowl after emptying it. 

And it goes back under our sink (=


There are SO many things we can compost instead of throw away into the garbage bin. take a look at this huge list


Friday, July 8, 2016

Mommy Series : Sitz Bath Recipe

     As I'm coming to the end of my pregnancy, my mind is in "prep-mode". By nature I'm a very organized person (at least I LIKE to be, because it helps me stay calm and collected). Lists are probably my favorite tools when it comes to keeping calm with everything that I need to get done. The last couple weeks I've been searching Pinterest for different things I need to have done before baby arrives. Even though I've had 2 babies within the last 3 years, It's still nice to have everything fresh in my mind as I start my last month of pregnancy. It's also nice to have things prepped before baby shows up so that afterwords I don't have to do much prep and can focus on bonding with my newborn. I also want to make things as easy as I can for David. Being a man, he doesn't read as much about all these things as I do. I want to do as much as I can beforehand so that he can help me out afterwords without getting lost on what he needs to do. 

     One very helpful thing to either buy or prep ahead of time is a sitz bath. For any women who will deliver vaginally, this will be one of the best ways to help you heal and recover. I knew about sitz baths with my last 2 deliveries, but I didn't think much of them and figured I'll just soak in a bath tub with some salt after I give birth. Although I didn't have too hard of a time recovering the last 2 times, this time I decided to do everything I could to help me heal. Having been either pregnant or nursing without any breaks for the last 3 years, I can really feel how my body needs some extra love and help healing. 
     What is a sitz bath you ask? It's the process of "sitting" in a little tub in warm water to help your downstairs heal after a vaginal delivery. If you search online, you'll find special equipment you can put on your toilet for this. I've read its more comfortable to just fill a tub 1/3 to 1/2 with water and just relax in that rather than use an actual sitz bath tub, so that's the route I'm going with. Modern day sitz baths can be done in a normal bathtub and actually enjoyed with the newborn. Commonly just warm water is needed for a sitz bath, but adding unrefined salt and herbs helps the healing process.  
     Originally I was going to buy a pre-made packet of herbs to use after I give birth, but when the natural store I went to didn't carry it, I quickly looked up a recipe on pinterest and just got the ingredients the store carried that the recipe called for. 

So here is my sitz bath recipe that I'm going to use and how I prepped it.


Ingredients:

  • 2oz Chamomile
  • 2oz Yarrow Herb
  • 2oz Calendula
  • 2oz Lavender 
  • 8-9 oz Unrefined Seas Salt (Very Important that its unrefined and sea salt. That's what has the most nutrients)


     If you look up other herbs that help with healing, feel free to add those also. This isn't a cut and dry recipe, just what I was able to find in my local store. 


Prepping:


My original plan was to mix all herbs and salt together, store them in a glass jar and steep 1-2 cups in the bath each day for the first week after I give birth. But I didn't like how all the herbs wouldn't mix evenly and the salt would fall to the bottom of the jar, so I decided to make my life after birth even easier. I decided to steep all herbs and salt together in a big pot, and then freeze the water in water bottles. When baby makes its grand entrance, I can either thaw a frozen bottle a day in advance or  throw it in the bath tub and let the hot water melt it. When it thaws I'll just pour it out and mix with the rest of the bath tub water. Easy peesy.


Step 1: 

I took 7 water bottles and poured them into a large pot and brought the water to a boil. After it came to a boil I moved the pot off the heat and waited about a minute for the water to stop boiling completely. 


Step 2: 

Add the salt and all herbs to the water and stir. make sure to stir for a good few minutes so all salt is dissolved. You can even add salt first and stir it to make sure it dissolves before adding the rest of the herbs.


Step 3: 

Cover with a lid and let it stand. I let mine stand for 1.5-2 hours while I was prepping other things. You can go anywhere from 30 minutes to over night until the water is room temp. 


Step 4:  

This is optional if you don't want to wait for the water to come to room temp on its own. I filled my sink with ice cold water and added the pot to it. After about 20-30 minutes it was a decent temp. 


Step 5:

Strain herbs. Make sure you do it in small amount so that you can squeeze all the water from the herbs. 


Step 6:

Pour into water bottles and freeze. Make sure you don't fill the bottles completely to the top or else the bottle might bust when the water freezes and expands a little. 


Optional: I put all the left over herbs into a gallon freezer bag and froze that also. In case I feel like I want to use them in a bath after all the bottled water is used up. 


Wednesday, June 1, 2016

Mommy Series : Cleaning Schedule

     This post will be a little different than my previous posts. I've mainly done pregnancy/baby updates and entries on different activities/trips we've taken as a family. I wanted to venture out from my "diary entry" posts and do something a little different. I want to do a little series of posts that will take this blog in a different direction. Today's post is dedicated to explaining how I keep myself sane when it comes to keeping my house clean and not overwhelming myself with too much work on one single day.


     As a stay at home mom, I make my own schedule regarding everything that I need to get done. And I've found that personally, I feel most in control and accomplished when I have a set schedule that I can follow instead of doing chores on a whim. With a schedule I know what needs to be done that day, and plan my time accordingly. I know some mom's like to get all the cleaning done in one day. I Probably would do the same if I didn't have 2 toddlers and was 34 weeks pregnant. I physically can't clean the whole house in one day. Also I like that at any given day, if I'm keeping up with my schedule, my house it somewhat tidy. 
     Obviously I don't always follow the schedule to a T. There are days when one or both of my kids are sick and they need my attention more than the laundry or vacuuming does. Also, being 30+ weeks pregnant and having a 2 year old and 1 year old who are almost fully dependent on me makes me tired. So some days when I can tell my body won't be able to handle doing chores, they get put off for another day. Baby#3 needs a healthy mama and over working myself won't benefit the baby or myself in anyway. But I have come to realize that with my personality type, it's a lot easier to have a schedule written down, even if I can't always follow through with it. 

     I love to watch/read other mom's home duties and how they handle them and schedule them out. Being a stay at home mom is my job, and when I watch or read other mom's ideas and tips/tricks I get insight and better my own job. Hopefully someone can find this useful (= 

     Side note: this schedule is what's working for me at the moment. Like I've mentioned, I'm currently very pregnant and have 2 little ones. In a couple months I will have a newborn who will need to be cared for and nursed often. My cleaning schedule might change at that point, but I wanted to share this one even though it might change. 

Daily

  • Make bed. (I TRY to get this done when I first get up. It helps me from feeling like the room is untidy)
  • Wipe down table and counter. (The table actually gets wiped down multiple times a day)
  • Water herbs (These are outside on the deck and get watered at the end of the day)
  • clean up kid's toys. ( Gabriel does a good job at doing his own room, but I still have to do Noelani's room. Most times its the books that are all over the floor)
  • Take out trash/indoor compost bowl
  • Load and start dishwasher. (I like waking up to a clean kitchen and clean dishes in the dish washer)
  • Vacuum kitchen floor. (Gabriel also loves doing this, so he does it quiet a few times a day)

Monday 

  • Kitchen: take everything off counters and wipe clean + disinfect. 
  • Dust/wipe all appliances that are on the counters. 
  • Wash sink really well. 
  • Wash kitchen/dining floor. 

Tuesday

  • Change/wash bedsheets.
  • Laundry (load of regular clothes, load of bedsheets, load of towels if there are enough to wash)
  • Water all indoor plants

Wednesday *Swing Day* 

(Each week I do something from the list according to the need. I try to go through the whole list before starting over on it again) 

  • Week 1: Clean out fridge/pantry. Wash kitchen trash can
  • Week 2: Clean/sort/dust office
  • Week 3: Tidy kids' closets and wash all baseboards
  • Week 4: Clean/sort kitchen cabinets 
  • Week 5: Clean/sort bathroom cabinets 

Thursday 

  • Clean bathrooms (we have 3, and 2 of them get used daily)


Friday 

  • Laundry (load of regular clothes, load of David's work clothes, load of towels if there is enough) 
  • Vacuum and dust furniture 
  • Wash Windows/walls/door knobs 


Saturday

     Saturday's I've left for chores that can be left undone some weeks. Saturday is our day to spend with family and sometimes there are activities we like to do together or just relax and rest. On days when I am up for some chores I try to do these
  • Weed flower garden
  • Mow lawn 
  • Take small compost bin to back compost (gets done every Saturday in the evening)
  • Wipe down large kitchen appliances (gets done every Saturday in the evening)

Tuesday, September 17, 2013

"Cocoppa" How to Personalize Your iPhone Apps.

Hey everyone, so a while ago I came across a repin on pinterest about an iphone app called Cocpppa. 

Basically this app lets you change and personalize your iphone app images. Don't know exactly what i mean?
maybe this will help


Those are screen shots of the first 2 pages on my iPhone.

(= 

I wanted to share this little gem with anyone who likes these kind of things.
Now I will warn you, it is a long process, especially if you have alot of apps you want to personalize and it can be a little confusing for those of us who aren't very tech savvy.  
Also...it might be addicting (=

Rather then writing out all the instructions out on this blog, I'll redirect you to a wonderful blog about how to use the Cocoppa app.

enjoy (=


xoxo